Description
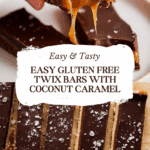
These Gluten Free Twix Bars combine a buttery coconut flour shortbread crust with a rich, homemade coconut caramel layer and a smooth dairy-free chocolate topping. Perfectly sweetened with coconut sugar and maple syrup, these bars are a healthier twist on the classic treat, with flakey salt enhancing the flavor contrast. Ideal for gluten-free and dairy-free dessert lovers.
Ingredients
Scale
Shortbread Crust
- 3/4 cup coconut flour
- 1/4 cup arrowroot starch
- 1/2 cup coconut oil (softened)
- 1/4 cup maple syrup
- 1/2 tsp vanilla extract
- Pinch of salt
Caramel Layer
- 1 13.5 oz can full-fat coconut milk
- 1/2 cup coconut sugar
Chocolate Coating
- 3/4 cup dairy-free chocolate chips
- 2 tbsp coconut oil
- Flakey salt (for topping)
Instructions
- Preheat Oven and Prepare Pan: Preheat your oven to 325°F (163°C) and line an 8×8 inch baking pan with parchment paper to ensure easy removal of the bars later.
- Make the Shortbread Crust: In a mixing bowl, combine the coconut flour and arrowroot starch. Add softened coconut oil, maple syrup, and vanilla extract, mixing until you have a smooth dough. Press this mixture evenly into the bottom of your prepared pan, then use a fork to puncture holes evenly across the crust, which will help it bake evenly.
- Bake the Crust: Place the crust in the oven and bake for 25-30 minutes or until it turns lightly golden brown. Once baked, remove it from the oven and let it cool completely at room temperature.
- Prepare the Caramel: In a medium saucepan over medium-low heat, whisk together the full-fat coconut milk and coconut sugar. Stir frequently and bring the mixture to a medium simmer. Allow it to cook gently, stirring often, for 25-30 minutes until the mixture thickens into a rich caramel consistency.
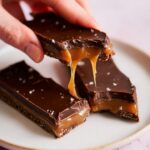
- Assemble Caramel Layer: Pour the thickened caramel evenly over the cooled shortbread base. Spread carefully to cover the entire surface. Transfer the pan to the refrigerator for 2-3 hours or overnight to let the caramel set firmly.
- Melt the Chocolate Coating: Using a double boiler or a gentle heat method, melt the dairy-free chocolate chips together with coconut oil until smooth and glossy.
- Apply Chocolate Layer: Pour the melted chocolate over the hardened caramel layer and spread it evenly with a spatula. Allow the pan to cool slightly before placing it back in the fridge to let the chocolate harden completely.
- Cut and Serve: Once set, remove the bars from the pan using the parchment paper edges. Sprinkle flakey salt on top to enhance flavor. Use a sharp knife to cut into 12 bars or your preferred size. Serve immediately or store them in the fridge with parchment paper separating layers to avoid sticking.
Notes
- For best results, allow the caramel layer to chill overnight for a firmer texture.
- You can substitute arrowroot starch with tapioca starch if unavailable.
- Use full-fat coconut milk for a creamy and thick caramel.
- Store bars in an airtight container in the refrigerator to maintain freshness.
- Double boiler method helps prevent burning the chocolate when melting.
- Prep Time: 20 minutes
- Cook Time: 1 hour
- Category: Dessert
- Method: Baking
- Cuisine: Gluten Free
Keywords: Gluten Free Twix Bars, dairy-free dessert, coconut caramel bars, homemade Twix, gluten free baking, vegan chocolate bars